Showing posts with label washi tape. Show all posts

Saturday, 20 July 2013

A published lo to share. :-)

Hi it's me again!
Today I found this among some older photos I was looking on my computer today.
I had almost forgotten about it :-)

This layout was published in the previous issue of Swedish scrapbook magazine Inzpira.
I was delighted to be included in the mag as I am not one to send in applications very often.
I think this was only my second time.
( I tried once with a lo for Scrapbook Trends, even if I knew my style was not theirs,... :-) )
I made this one for  musical theme and also after a sketch in that issue.

Here are a few close ups:

I cut the leaves from gold cardstock and also added some gold paint here and there on my page.
I white-washed the little frame for my title with gesso and smeared on a little gold to give it a more vintage look.


I used a mask with gesso to build up the background and I also added a small dash of pink mist
as well as gold arrows. The red chevrons and the teal strips are washi tapes.


Finally, a closer inspection of my 'edge-ruffles' if I may call them that.
I cut several strips and work on each one of them to achieve this distressed look.


Thanks for dropping by and thanks for your kind messages!
Hugs!


Friday, 22 March 2013

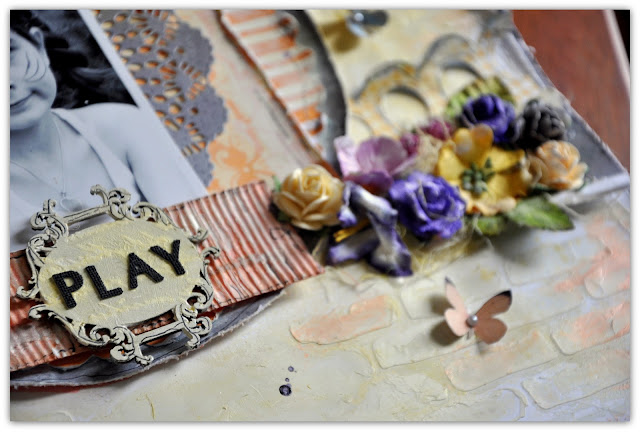
'Play' -for the new combo at Les Papiers de Pandore.

Yay, time for a new beautiful colour combination at Les papiers de Pandore. Lovely springy colours to try and make us forget this apparently eternal winter we are experiencing at he moment. Last night we got about 8 new centimetres of snow at our house....

Here is my page for the combo:

I wanted to use a different photo for this originally but had ran out of ink for my printer so I had to use this older, but cute photo of Beatrice as a cat :-)

Here is the photo of the gorgeous combo we use as inspiration:


I am also entering this into the challenge over at Berry72Blue to use paint on your lo.


I tore the paper to add texture and together with the mask gesso and mists I used I think I created a pretty shabby atmosphere for the photo. I painted and doodled on everything, even the flowers.


The little threads you can see are drawn from cheesecloth and misted yellow. I have used a mix of older and newer collections on this; Lovely Birds, Little Winter Circus and Invitation.
These are all beautiful well made collections by Julie Blanc who is a really wonderful artist
and designer. I absolutely love her work!!


Of course I had to add some pretty flowers here as always.
These are from my stash and by Prima and Petaloo. The tiny ones are by Papirdesign.


I thought it would be fun to incorporate some of my humongous washi-tape collection on this lo. After some thinking I decided to make small pennants and use as a banner with some string. 
I picked tapes that had the colours of the combo and cut off pieces of ca 5 centimetres. 
I made sure the string was in the middle of the tape before  sticking the two sides of the tape together.Then with some scissors I just cut the right shape. 
It could be quite fun to use scalloped scissors for this as well.


I used a ribbon holder chipboard from Dusty Attic as a base for my title. I gave it a lick of gesso and let it dry. Then I used the same gesso through a script mask and misted with yellow glimmermist.Then all thet was left was to doodle with a slick writer from American Crafts around the edges. The letter stickers are fabric ones by Prima.


That was all for today. Why don't you pay a visit to the Pandore blog to see what the others made....? I wish you all a wonderful week end!
Hugs!


Monday, 1 October 2012

Step-by-step tutorial for a deep frame using "Echo Park For the Record 2 Documnted"


Gosh, can you believe it is already October....Time really flies!!

I made this simple little tutorial for a monthly assignment over at My Scrapbook Nook and thought I would share it with you here as well.

" Hi, this is Bente with a post for you today.
This will be my last post as a DT member for 'My Scrapbook Nook'. It fills me with sadness 
that it shall all come to an end within just a couple of days. 

I will share with you my process for making this framed piece that was a birthday gift for 
my cute god-daughter. I have taken photos of the step by step process:

 I started out with a deep frame from Ikea. 
I think it should be pretty easy to get hold of in many places of the world.

You can easily open up the back of the frame. You need to be able to add all your little bits and 
pieces inside the square passepartout frame .

To start gather all the different papers and embellishments you want to use. As I am a very 
impulsive scrappers I add mine as I go along, but that may not work for all of you.

 I cut a large square to serve as the backing of the frame opening . Then I cut another square 
to fit inside the opening with a little of the backing piece showing.


I want to add some texture to my paper with a mask. 
I add a thick layer of gesso so I the pattern will be pronounced on the paper.
You must now leave the gesso to dry for a while.

While waiting for the gesso to dry you prepare your photo by adding a string of twine and 
making a small bow. You might even look for  some more small embellishments like a 
small flower or a jewellery finding in the shape of a heart like the one I used.
 

As soon as everything is dry you can start assembling the layers of paper etc. 
In the above photo I have glued the base paper behind the opening, and in the next one you'll
see the green side of the paper underneath the yellow one.

It is now time to start building up the design by adding everything layer by layer. 
I have embellished the rim of the freame with a fun washi tape. It's so easy to add, and if it goes on a little crooked you just lift it and start again.


You can see I like to add my layers with pop dots between them because I want a lot of dimension.
If you prefer a more flat design just stick everything directly on top. 


I added my matted photo a little at an angle and used a lot of the stickers and chipboard  fom "For the Record 2" as decoration. To finish off the design I added a small banner along the top fastened with some red twine.


This is the look of my finished piece before placing it back in the frame. 
I hope you like it and that you will give it a try. As you can see it is so easy but also quite 
decorative. Because of the deep frame you may even add memorabilia to the display. 
A pacifier, a toy car or a small teddy bear will easily fit inside the glass.
 Thank you for your attention., and I hope we shall meet again somewhere in cyberspace :-)"

Thanks !
Related Posts Plugin for WordPress, Blogger...